Search This Blog

Sunday, November 18, 2012

Panchetta

This is how the Panchetta started out about four weeks ago.  It cured for a little over a week with the spices, etc. in the bag, then got a good rinse and dried off.  Now it has been air drying for three weeks.

 This is after three weeks of air drying.  The Lardo is on the left and the Panchetta is on the right.  The Lardo will continue to dry, wrapped to keep the light out, in the refrigerator for another several months.
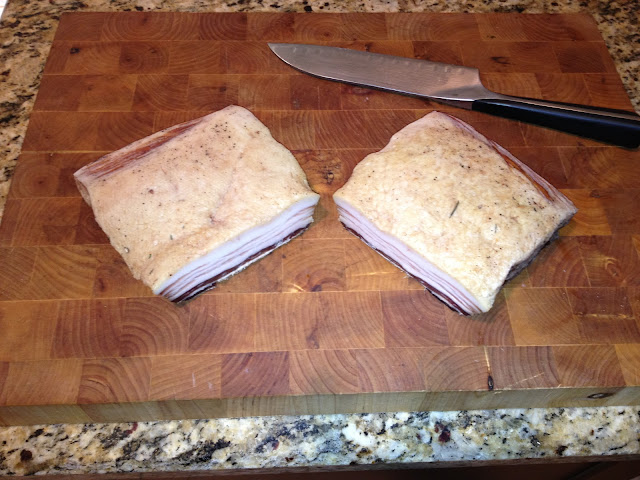
This is the Panchetta, sliced in two.  The fat is bright white and the flesh is dense and dark.  This is strong stuff, so a little goes a long way.  I divided it into six pieces, about 6 oz each.   
After vacuum sealing each of the pieces, I put them in the freezer.  There is very little water content, so even when frozen the are pliable.  They just take a few minutes to thaw.  When diced and rendered they go really will in salads, pasta, chili, or any number of other things-- more as an ingredient than a stand-alone item.

Wednesday, October 31, 2012

Green Chile

After making the Jardiniere yesterday I still had a lot of good green chiles left, so they needed to be canned so they were not wasted.  I use green chile in everything, so I'm glad to have them.
I put them on a cookie sheet and put them under the broiler in the oven until they were blistered, then flipped them and did the same on the other side. 
While still hot out of the oven, put them in a double plastic bag and close for a while to steam the skins off.  Remove them while still hot for easier skinning and seeding. 
Here they are skinned and seeded.  Ready for a dice now. 
All diced up and the kitchen smells very good. 
Here they are after 35 minutes in the pressure canner.  Can't wait to use them. 

Tuesday, October 30, 2012

Jardiniere

It's the end of the garden season and I spent yesterday taking everything that was still growing out of the garden, but the potatoes-- they still have a few days before the first freeze.  I had beets, carrots, peppers (Bell and hot), and tomatoes (green and ripe).  I also had a few herbs left-- parsley, thyme, and basil.  I started looking at all of it and remembered, I've been wanting to make Jardiniere for a long time; even better that most of the ingredients came fresh from the garden.
 Lorin planted a bunch of different peppers in the spring and one of them did really well.  He didn't do a good job of keep tabs on them though, so I don't know what kind they are.  They are big and long like Big Jim and I assume they are some type of Poblano.  They also have a really nice spice level.  I used these as the base of the Jardiniere.  
 
Also included are celery, onion, green tomato, yellow squash, zucchini, carrots, garlic, bell peppers, and sweet peppers.
 This is all the vegetables soaking in salt water (about 1/2 cup salt and water to cover) for eight hours.  After that rinse everything very well.
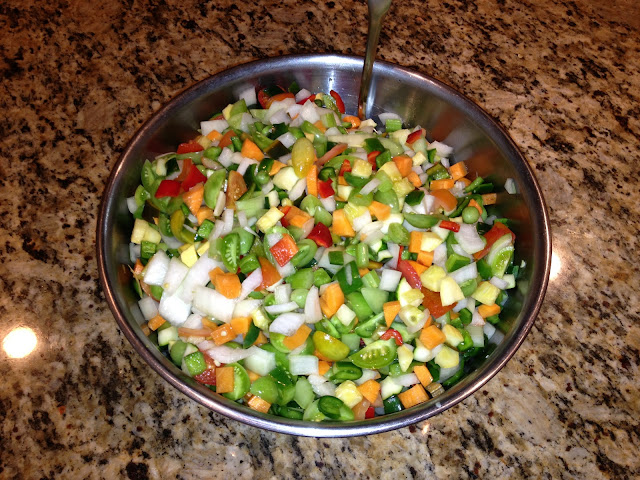
 Here it is rinsed and mixed.
 In each of the pint jars is fresh Thyme, oregano, a bay leaf and 1/2 teaspoon of pepper corns.
 Assembly line works well for me.  The fresh Thyme from the garden is in the back ground.  It is actually Lemon Thyme.  I am amazed at how lemony it really is; brings a very fresh something to food.
 Spoon it all in up to the mark at 1/2 inch from the top for headspace. 
Traditionally, Jardiniere has green olives in it too.  Some people don't like it though so I did six without and four with.  I definitely like it.  You bite into one of those and it really makes the dish for me.
After all the veg is spooned into the jars, mix about half and half white wine vinegar and olive oil.  They they need processed in boiling water for ten minutes.  They should last forever after that.  When you're ready to use the Jardiniere, just shake the jar and the vinegar and olive oil in addition to the herbs that went into the bottom of the jar before the veg makes a really nice vinaigrette.  This stuff is great as a side dish to just about anything, if you like pickled things, but is especially good with meat-- like pot roast or in a roast beef sandwich.

Thursday, October 25, 2012

Smoked Meat

It's been a long time since I had the time to really get serious with the smoker, but I found I had some time on my hands recently and took the opportunity to smoke a bunch of different meats to put up for the winter.

Below, top, is a fairly traditional bacon curing.  It does have a lot of extra pepper and garlic in it to make it a little more savory, but it is still sweet bacon that my family likes best.  Below left is pork belly Lardo.  I haven't tried this before, but thought is sounded good.  I have made regular Lardo before.  The only real difference is that you use belly instead of fat back to make the lardo, so it is meaty.  Bottom right is pancetta.

 The bacon cured for just a week and then I smoked it with Mesquite for an hour with the other meats.  The Lardo and Pancetta are still curing, for a total of two weeks.  Neither will be smoked.  The Panchetta will be air dried for a week and then packaged; the lardo will be air dried for the better part of a month before it is packaged.  The Panchetta will also need to be cooked before it can be eaten; the Lardo will be sliced very very thin and eaten raw on various things.
This is the bacon again.  It takes on a really nice mahogany color because of the brown sugar and molasas.
 Lardo with all the fresh herbs from the garden showing up-- parsley, thyme and garlic mainly.
 Panchetta with some of the same herbs from the garden.
This is everything packed into the smoker.  A full briskett on top, sliced into halves.  In the middle are two pork bone-in shoulders.  On the bottom is the bacon from the pics above.  To the right are three racks of pork ribs.
 I put a dry rub on the ribs and smoked them for four hours.
 Dry rub on the briskett and smoked them for ten hours.
 Dry rub on the pork shoulders and smoked them for ten hours.
 The bacon, just out of the cure and washed and dried very well, before smoking an hour.
 Nothing better than reading a book while you tend a smoker.  Smells good.  Very relaxing.
 The ribs after four hours of smoke.
 The briskett after ten hours of smoke.  After six hours I wrapped them in foil.  You can see some containers in back with liquid in them.  These are the juices from the beef and pork that I saved from the foil after four hours of additional smoke time.  That broth is liquid gold.  It is very strong and can be used for all kinds of kitchen magic later.  It is really very close to a demi-glace.
These are the pork shoulders.  Again, I wrapped them after six hours of smoke in foil, then smoked them for an additional four hours.  Fall apart tender and good.  Had pulled pork sandwitches the next day and they were very good.

Now I have a freezer full of all this goodness.  I like it when I have spare time.

Wednesday, October 17, 2012

Country Pork Pate with Dried Apricots and Pistachios

Just spent a little time in Paris and had some great food, so I couldn't wait to make some French type food when I got back.  I've been wanting to make a county pate anyway, so this was a good opportunity.  Instead of grinding the pork I went to work on it with a cleaver old-school.  I wanted larger, nonuniform pieces so it looked more interesting when sliced and also provides different textures.  I've seen a lot of recipes where dried cranberries are used as the fruit component, but I had these really good, fresh dried apricots (and I love apricots-- they also go well with pork) so I used them.
I put it in the oven en a bain-marie for five hours and the smell was increadable.  After it came out of the oven I put a piece of plastic wrapped cardboard over it and then weighed it down with a gallon of milk in the refrigerator to compact it.  The next day I put it in a warm bath for a couple of minutes to loosen it up, ran a knife around the edges, and put it on a cutting board.
 After it was on the cutting board, I put it in the freezer for about 20 minutes to firm up so it would slice easily.  You can see that it did.  The pieces are great looking with the spices, fruit and nuts and smell really good.  I will freeze these so that they can be brought out a couple of hours before serving.
 Here they are vacum sealed and ready to go into the freezer.  Great for a dinner party or when company drops by unexpectedly.
This is just a close-up so you can see all the good bits in the sliced pieces.

Saturday, September 15, 2012

Green Chili, Garlic and Onion Sausage

It's been a while since I made sausage.  I usually make venison sausage during the winter, but I got the urge and made up a recipe to use some New Mexico green chili from Hatch.  After it was made I grilled some and added it to a white been stew, something like cassoulet, and it was very good.  

Here's the sausage recipe:

8.5 lbs pork butt, cubed and ground through the large die twice
12 roasted and seeded green chilis, minced
1 large yellow onion, minced
1 large head of garlic, minced
3 tablespoons salt
2 teaspoons pepper
2 eggs
1 cup heavy cream

After you have cubed the meat, add everything together and mix well before putting through the grinder.  You can put it in links or just leave as is if you want.  I linked it because I like it that way, but it's not necessary.  

After everything is combined, you have about 10 lbs of sausage.  
I linked it in natural hog caseings.
Here is is linked, just prior to a light smoking.  
Smoking isn't necessary either, but it tastes good.
 You can see the grill marks on some of these where they were in the smoker.  
I put them in the freezer to firm them up after the smoker, then vacum sealed them.
The easy way to cook them when they are sealed like this is to put them in a slow boil for about 20 minutes and then take them out of the bag and grill them off.  

If you want the cassoulet-ish recipe, here it is:

3 links of the sausage, grilled and sliced
2 cans white beens (navy or whatever you like)
3 cups chicken stock
1 sprig fresh basil
salt and pepper to taste

Drain the beens well and simmer in the chicken stock with the basil sprig for 10 minutes.  Add the sausage, remove the basil, adjust the seasonings and eat.  Very simple, but tastes great.  Should be enough for three.

Sunday, July 15, 2012

Hedge No More

I have one fairly large problem with my little backyard garden, I have to water over the top with sprinklers because that's how my grass is watered.  The yard was designed for grass, not vegitables, so. . . .  Vegitables like to be watered on the bottom.  If you don't, you get mildew and other issues.  My hedge of tomatos and cucumbers were starting to show the effects.  Plus it has been so hot here that no new fruit was really setting anyway.  Same thing happened last summer.  They did start to produce again when it started to cool down, but I had weeks of them looking bad until then.   Finally, I had to travel for work and so some of the extra watering didn't get done when it was needed so they were really looking sorry.  My solution was to pull most of them and plant potatos where they had been.  I should get a good crop of potatos and not have to look at an ugly garden in the meantime.

Sprinklers make the lawn look great, but the garden look bad.  Here is the garden with the offending plants gone.
When everything got pulled, we picked everything, whether ripe or not.  If it's ripe, we will eat it fresh.  If it's green, it will be pickled.
I don't know the name of the little red tomatos on the left, but they are great.  They are still growing in the new L shaped bed.  They get a lot of shade and so don't look as bad as the rest.  I never caged them in the spring, so they have just run all over the place.  The round red tomatos to the right are Porters.  They were developed a few miles from here in the 1930's.  They stand up to the hear well.  They don't have a perfect texture, but not bad.  They didn't get pulled either.  The yellow tomatos in the upper right are Lemon.  My first year to grow them.  They weren't in a great spot, but did relatively well.
These are some of the last from the monster.  The heirloom yellow pear was simply huge this year.  I didn't pull it, but did cut it back quite a lot.  It should put out some new growth and keep producing.
Here are the potatos cut and curing before they are planted.
I made homemade fermented sauerkraut about three weeks ago.  I tasted it yesterday and it was pretty good so I jarred and processed it for 15 min. in a water bath.  Should be good for a long time.  I'll make dill pickles next.  In front are the roasted bell peppers I grew.  I only had one plant and wanted to do something nice with what little was produced, so I decided I would let them mature until red, roast them and put them up in olive oil.  They will be good for sauces and salads now.
Kraut looks pretty good.  I have a jar in the fridge getting cold.  It won't last long.

Sunday, July 1, 2012

Makin' Bacon-- Part II

Alright, a week ago I had a post about making bacon with the dry rub, etc.  Those two pieces of bacon, 10 lbs, have been curing now for a week.  Today I took them out and rinsed them very well in cold water.  After that I patted them dry and put a bunch of fresh ground pepper on them. The result is below.
I left them to set for several hours in the open air before smoking.  This allows a film to coat the meat that helps the smoke to stick.
Here is the meat in the smoker.  It is really basic.  I like a light smoke on my bacon, so only a couple of hours is necessary.  I keep the heat at about 220F for a hot smoke. 
This is the finished product.  It has a really nice brown, smoked coating and smells great.
Here it is sliced into two.  Notice how think and meaty it is.  The lighter shade at the top on the piece to the right is not fat.  That is a nice thick layer of light pink meat.  There is actually very little fat, maybe 20%.  It slices like butter.  At this point I cut it into smaller, one severing pieces and vacum pack them individually to use as needed.  I fried up some of the end pieces you see on the edge of the photo and it was very good.  It is very different than the type I made last time. This has a more intense flavor.  You can taste all the herbs and garlic.  This isn't the kind of bacon you sit down and eat a pound of.  It's very rich and it doesn't take much for me to feel full.  Rich food does that to me.
This is actually bacon from the prior batch that is the more traditional, sweet type.  We decided to have breakfast for dinner, so I fried some up.
It cooks up very well and is crispy golden when finished.
These are some of the hierlooms from the garden.  I wanted to use them so I cut them up, along with some pear type and stewed them with some onion, garlic, tyme, red pepper flake, salt and pepper.  
Here it is when it is nice and stewed down, but still with plently of liquid.  I poached three eggs in the stew and spooned the whole thing over toasted home made bread, with the bacon on the side.  It was good.