Search This Blog

Friday, April 19, 2013

It Begins

Finally planted the garden the first week of April (the 6th).  I thought I had waited long enough that the chance for a cold-snap was over, but I was wrong.  A couple of days after these pictures were taken it froze and killed the cucumbers.  Everything else seems to be a little shocked, but alive.  You can see the Asparagus in the foreground already three feet high.  This was the first year we actually ate any of it.  I gave it a full three years to mature first.  I hate to waste space, so there are chives growing under the Asparagus.


 These are the little cucumbers that ended up freezing.
 These are yellow crook neck squash.
 This is the garlic that was planted last fall.  I mulched it very heavily and then didn't take some of it off in the spring and ended up killing a lot of it.  So I planted some spring bulbs just to get a little more for the season.
 This is the Lemon Thyme.  It is great and comes back every year.
 My little pear espalier.
 One little pear that made it.


Sunday, February 17, 2013

Bacon Bomb-- with Homemade Guanciale

I've made this once before, but this was,  by far, the best result.  It's a mixture of three types of pork along with some of the things that compliment pork the most-- onions, apple and BBQ sauce.  Sounds good but a little heavy?  Not really.  It's cooked low and long and most of the fat renders off.  The onion and apple give some bright notes to what would, otherwise, be a heavy meal.  I'm not saying it's diet food, but it's not as bad as you'd expect from the name.

This dish is all about layers.  I made some cured guanciale a while back.  It is made just like bacon, but it comes from the hogs jowl.  It does taste different, slightly, from bacon though-- more mild.  I cubed and rendered the guanciale until it was really crisp.  It is important to get it very crisp  because it will be wrapped around the onion and apple mixture and will rehydrate.  If you don't render it properly to begin with, it will be rubbery.


 The guanciale has a nice pink color from the curing.  It smells great.

Here it is well rendered, before draining.  Let it cool before using.

 I saute the onions too, in some of the rendered guanciale fat.  Not for too long, just enough to get th raw taste out.  At the very end I added the apples and cook for just a minute (not shown).  I wanted to leave the apple as raw and crisp as possible so that it would hold its shape and not be mushy after the long cooking time.  Thyme and a little grated nutmeg go well for seasoning the oinions and apple.

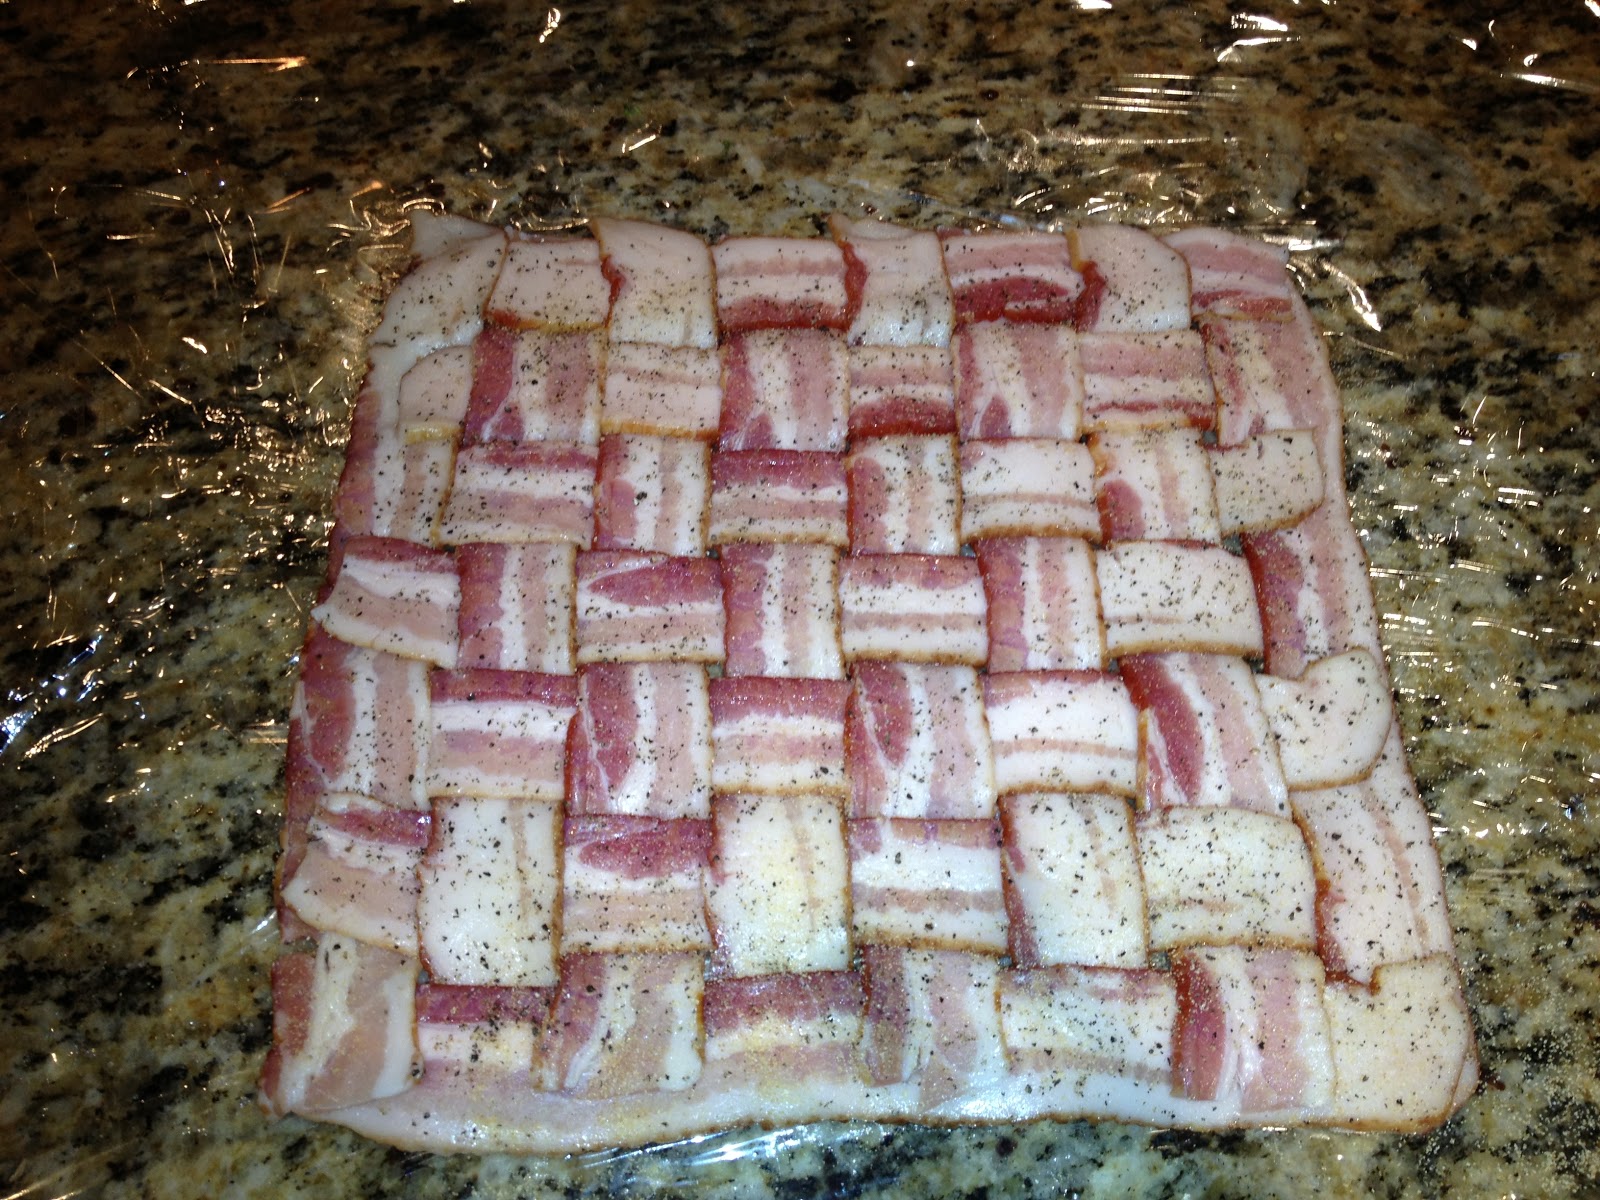
Next, while all the rest is cooling, make a latice out of your favorite bacon.  A one pound pack works perfect.  Use half one way, half the other just like you would a pie.  It makes the end product look nice.


You notice I did this on top of plastic wrap.  It makes it easy to roll later.  Now pepper what will be the inside of the bacon.  I also added a little garlic powder.  You could also put a thin layer of BBQ sauce on at this point (I didn't, but it would be good and I probably will when I make it again).

Now take a one pound pack of regular pork sausage and press it over the entire bacon latice.  I would add a thin layer of BBQ sauce at this point too.

Spoon on the onion and apple mixture to cover all the sausage.  Add salt, pepper, and any other spices you like.

Here is where you sprinkle the well-rendered guanciale.  It makes for a flavor difference, but also a textural difference.  If you don't have guanciale, use rendered bacon.  You could also do variations with ham or other pork products.

Now just roll it up, using the plastic wrap to pull it tight.  After it is well-wrapped, I take both ends and spin it over and over and it tightens the wrap into a sausage like package.  I leave it to sit at this point while the stove comes to 275.

You can see that I cook the bomb on a wire rack over a casserole dish (seam side down).  This allows the fat to render off.  Put a half inch of water in the casserole so the fat doesn't burn on the bottom.  I also season the top of the bomb.  You can see there is plenty of pepper here.  Add what you like.  Cook for two hours at 275 then raise the temp. to 350.  While the stove comes to temp, put a thin layer of BBQ sauce on the outside to glaze.  Cook for an additional 30 minutes at 350.  You can add another layer of BBQ sauce after 15 minutes if you want.

Slice and serve with whatever vegitables you like.  Enjoy.

Sunday, November 18, 2012

Panchetta

This is how the Panchetta started out about four weeks ago.  It cured for a little over a week with the spices, etc. in the bag, then got a good rinse and dried off.  Now it has been air drying for three weeks.

 This is after three weeks of air drying.  The Lardo is on the left and the Panchetta is on the right.  The Lardo will continue to dry, wrapped to keep the light out, in the refrigerator for another several months.
This is the Panchetta, sliced in two.  The fat is bright white and the flesh is dense and dark.  This is strong stuff, so a little goes a long way.  I divided it into six pieces, about 6 oz each.   
After vacuum sealing each of the pieces, I put them in the freezer.  There is very little water content, so even when frozen the are pliable.  They just take a few minutes to thaw.  When diced and rendered they go really will in salads, pasta, chili, or any number of other things-- more as an ingredient than a stand-alone item.

Wednesday, October 31, 2012

Green Chile

After making the Jardiniere yesterday I still had a lot of good green chiles left, so they needed to be canned so they were not wasted.  I use green chile in everything, so I'm glad to have them.
I put them on a cookie sheet and put them under the broiler in the oven until they were blistered, then flipped them and did the same on the other side. 
While still hot out of the oven, put them in a double plastic bag and close for a while to steam the skins off.  Remove them while still hot for easier skinning and seeding. 
Here they are skinned and seeded.  Ready for a dice now. 
All diced up and the kitchen smells very good. 
Here they are after 35 minutes in the pressure canner.  Can't wait to use them. 

Tuesday, October 30, 2012

Jardiniere

It's the end of the garden season and I spent yesterday taking everything that was still growing out of the garden, but the potatoes-- they still have a few days before the first freeze.  I had beets, carrots, peppers (Bell and hot), and tomatoes (green and ripe).  I also had a few herbs left-- parsley, thyme, and basil.  I started looking at all of it and remembered, I've been wanting to make Jardiniere for a long time; even better that most of the ingredients came fresh from the garden.
 Lorin planted a bunch of different peppers in the spring and one of them did really well.  He didn't do a good job of keep tabs on them though, so I don't know what kind they are.  They are big and long like Big Jim and I assume they are some type of Poblano.  They also have a really nice spice level.  I used these as the base of the Jardiniere.  
 
Also included are celery, onion, green tomato, yellow squash, zucchini, carrots, garlic, bell peppers, and sweet peppers.
 This is all the vegetables soaking in salt water (about 1/2 cup salt and water to cover) for eight hours.  After that rinse everything very well.
 Here it is rinsed and mixed.
 In each of the pint jars is fresh Thyme, oregano, a bay leaf and 1/2 teaspoon of pepper corns.
 Assembly line works well for me.  The fresh Thyme from the garden is in the back ground.  It is actually Lemon Thyme.  I am amazed at how lemony it really is; brings a very fresh something to food.
 Spoon it all in up to the mark at 1/2 inch from the top for headspace. 
Traditionally, Jardiniere has green olives in it too.  Some people don't like it though so I did six without and four with.  I definitely like it.  You bite into one of those and it really makes the dish for me.
After all the veg is spooned into the jars, mix about half and half white wine vinegar and olive oil.  They they need processed in boiling water for ten minutes.  They should last forever after that.  When you're ready to use the Jardiniere, just shake the jar and the vinegar and olive oil in addition to the herbs that went into the bottom of the jar before the veg makes a really nice vinaigrette.  This stuff is great as a side dish to just about anything, if you like pickled things, but is especially good with meat-- like pot roast or in a roast beef sandwich.

Thursday, October 25, 2012

Smoked Meat

It's been a long time since I had the time to really get serious with the smoker, but I found I had some time on my hands recently and took the opportunity to smoke a bunch of different meats to put up for the winter.

Below, top, is a fairly traditional bacon curing.  It does have a lot of extra pepper and garlic in it to make it a little more savory, but it is still sweet bacon that my family likes best.  Below left is pork belly Lardo.  I haven't tried this before, but thought is sounded good.  I have made regular Lardo before.  The only real difference is that you use belly instead of fat back to make the lardo, so it is meaty.  Bottom right is pancetta.

 The bacon cured for just a week and then I smoked it with Mesquite for an hour with the other meats.  The Lardo and Pancetta are still curing, for a total of two weeks.  Neither will be smoked.  The Panchetta will be air dried for a week and then packaged; the lardo will be air dried for the better part of a month before it is packaged.  The Panchetta will also need to be cooked before it can be eaten; the Lardo will be sliced very very thin and eaten raw on various things.
This is the bacon again.  It takes on a really nice mahogany color because of the brown sugar and molasas.
 Lardo with all the fresh herbs from the garden showing up-- parsley, thyme and garlic mainly.
 Panchetta with some of the same herbs from the garden.
This is everything packed into the smoker.  A full briskett on top, sliced into halves.  In the middle are two pork bone-in shoulders.  On the bottom is the bacon from the pics above.  To the right are three racks of pork ribs.
 I put a dry rub on the ribs and smoked them for four hours.
 Dry rub on the briskett and smoked them for ten hours.
 Dry rub on the pork shoulders and smoked them for ten hours.
 The bacon, just out of the cure and washed and dried very well, before smoking an hour.
 Nothing better than reading a book while you tend a smoker.  Smells good.  Very relaxing.
 The ribs after four hours of smoke.
 The briskett after ten hours of smoke.  After six hours I wrapped them in foil.  You can see some containers in back with liquid in them.  These are the juices from the beef and pork that I saved from the foil after four hours of additional smoke time.  That broth is liquid gold.  It is very strong and can be used for all kinds of kitchen magic later.  It is really very close to a demi-glace.
These are the pork shoulders.  Again, I wrapped them after six hours of smoke in foil, then smoked them for an additional four hours.  Fall apart tender and good.  Had pulled pork sandwitches the next day and they were very good.

Now I have a freezer full of all this goodness.  I like it when I have spare time.